Thursday, March 31, 2011

Wanna have some fun?

On my early morning blog reading, I stumble across this fun little game. She did the leg work and found the details and I am going to jump in and play too.


Read more: http://cottonaddiction.blogspot.com/2011/03/pay-it-forward-giveaway.html#ixzz1IABibkDp

Here are the details:


1.I will make a little something for the first 3 people who comment on this post. It will be a surprise and it will arrive when you least expect it.

2.I will have 365 days to do it in. What's the catch? To get a handmade present from me, you have to play too! This means YOU pledge to send a little handmade something for 3 readers of your blog. It doesn't have to be quilty - just handmade.

3.You must have a blog.

4.Once you comment here, you must post about your Pay It Forward on your blog to keep the fun going - with the Pay It Forward badge. Also, feel free to join the Flickr group to see what else is being sent!

One little change for me, is that you are not going to know what your going to be getting. (Just a little of the surprise factor!!!)   LOL

I will be making "something" for each of the first three people to comment on this post and agree to play along {but I must get your e-mail address so I can reach you}. Not only will it be "something", but it will be made to hopefully suit your tastes. So, join in and spread some love!

Wednesday, March 30, 2011

HELP

I need your opinion!  I finished up a convergence quilt, finally. I loved the colors but when I went to class I realized that with the directional fabric I chose, there would be little I could do with converging it. So it turned out kind of boring, I think.

            So here is the plain quilt! 


And a closeup of the corner so you can
see what is going on with the print below


When I was quilting it, I remembered the driftwood I hauled home from one of my Alaska trips and decided to add this to the quilt for some interest. I am pretty committed on that front, but then I found some buttons that I made from polymer clay. Now I am a beginner in the very best sense of that word, in working with clay, so they are pretty primitive, should we say? Crappy might be another term I would loosely use. :-)  Anyway I started playing with them on the quilt too and am just not sure what to do.


Please let me know how you "all" feel. I am not going to stitch down anything until you decide for me!  Nothing like being put on the spot huh?  Leave me a comment and give me some feedback. I would love to check this one off my completed list!! Nothing like a little pressure huh????   LOL!!


Don't you just love the stick? Ok, I know it's just a stick, but it did come from Homer Alaska. It was driftwood! I plan to drill a couple of holes and get something cool to attach it with. Any ideas? Gheeze, can I possibly ask anymore of you all...

Monday, March 28, 2011

Cat out of the bag

It's official, my swap partner has received her runner and I can let the cat out of the bag and share it with you now. Mary sent me an email today saying it arrived safe and sound and she loves it.  Whew! That was a relief. When I went to box it up to mail, I realized that she had requested a table topper and I made a table runner. I offered to make up another for her and she declined saying she loved what she found in the box. I am so happy she liked it, but I was so irritated with myself for not reading things more carefully before I start something. Do you ever find yourselves only reading part way thru something then doing it wrong? It happens frequently when I am quiting too. That usually ends up in a ripping frenzy for me!!  ARRRRGH!   :-)  :-)


Anyway without further ado, here is the runner that Mary got. The theme was Spring/Easter, and Mary wanted a Spring theme. I was in Alaska the last  couple of weeks and found the boot. I knew right away that it was a perfect fit, to accessorize the table runner. I must confess, they are actually dog toys, that I have removed the squeaker from and cut the top off of. I have bought 2 others in the past just because I thought they were so cute. A quilt shop in Cooper Landing, was where I first saw it, and I  immediately went on a mission to find one for myself, being the Alaska junkie that I am.  This year proved to be more difficult to find them. Nothing on the Kenai Peninsula, but on a trip into Anchorage, I hit pay dirt!  Yippee!! Could it be, that this is really the hottest thing on the market? Hummm... Anyway, thanks Mary for the nice email, and I am so glad you liked your runner. May you enjoy it for years to come. PS: I hope the boot fits!  LOL

Added note: Yvonne asked about the pattern. It's from Calendar Quilts by Kim Schaefer. I did reduce it down a bit!

Friday, March 25, 2011

Shhh... It's a secret


Not that I can tell you a lot about it, but this is my swap quilt for the
Easter/Spring Quilted Table swap.
As of this morning it is winging it's way to my secret partner. Don't you wish you could play too? While this one is over, join us over at the Quilted Table Yahoo Group, we do some really fun things and have a great bunch of gals! Just click on the photo towards the bottom right side of my page and it will take you to our group!  Hope to see you there soon!

Wednesday, March 23, 2011

It's a sickness I tell you!

I know you have all seen the trivets that I seem to be addicted to as of lately, but here is a new batch I just have to share!

 For some strange reason, I just can't seem to stop coming up with new ideas and things to play with.


This little guy here is actually the center block for my civil war mini quilt that I did a few weeks back.  The little mini quilts make a perfect format for tiles. I have gone to larger 12" tiles for all of these. I like the larger size. They are really nice for larger casseroles and pans. No balancing act with these big guys!


This went to my son who loves whales. It almost didn't make it to him, I liked it so well. I see a wall hanging for myself soon!


I went thru my embroidery designs to come up with this one. A few scraps of this and that and you have something fun to use.

Lastly my Dresden plate template and a few scraps made for this little cutie.
Give you any ideas?  Grab something you haven't used lately and see what you come up with.
And be sure to share them with me. I can hardly wait to see them!  :-)

Wednesday, March 16, 2011

The Turtle


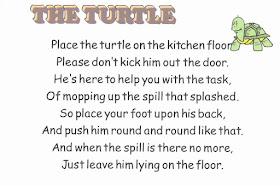
You have to admit that this is the cutest thing you've seen lately don't you??  My friend JoAnn brought him to me. His tummy is made out of terry cloth, so those spills on your floor can be cleaned up easily. Then he drops right in the washer. I love the little card that came with him too. Just one thing, he is so darn cute, that I don't want him to get dirty!  Now that just defeats the purpose, I know, but like I said, he's just so darn cute!!!!

Friday, March 11, 2011

Messanger Bag

If you have been following Aunt Polly over at Aunt Polly's Porch, you might have seen her tutorial for a great messanger bag. Click "HERE" to see it.

I have had a photo that was so special, that I knew I needed just the right project for it, and Aunt Polly came up with the answer. It was delivered to my friend Tyna this week, so now I can share it with you all.

The adorable cutie pa-tutti is her daughter, who is quite the little character. I had the privilege of working her school carnival last night. It's been many years since my boys were that age, and it sure brought back a lot of fun memories. I love seeing the little ones play the games and pick out their little prizes. I helped with the duck pond. Definitely only of the wettest jobs, but it sure was great fun...  and I got to live my childhood dream of eating more cotton candy than anyone should!!   :-)  :-) Ah yes it was a great night!


Polly used an assortment of scraps in  her bag. It's fun to pull together a few bits and pieces and come up with a great project. Little changes can truly make it yours. I made a small change to the inside pocket of the bag, when I choose to make it the width of the bag and stitch down a few lines to separate compartments and  have a couple places for pens to go. Your choices are endless, so head over to Aunt Pollys Porch and check out the tutorial for yourselves! I can hardly wait to see your projects.

Monday, March 7, 2011

BUNNIES BEES and BEARS

 
I can bearly wait to see them!!! Babies that is.


 I know, you have seen this quilt designs more than once here, but it is just my favorite baby quilt pattern. Finally, I get to leave, to deliver these quilts to 2 very special young ladies!  I have waited patiently for mom to give birth and it happened a month ago. I am very excited  see them.


I know it's been a very long time since my boys were babies. Actually I am thinking they were never that small...   But I do know, we never had the kind of photos that are available today. Look at these adorable pictures and you will see what I mean.
Now, you know "just" why I can hardly wait to get my hands on these girls!:-)  :-)

Sunday, March 6, 2011

Memories


It's finished! I have been working on this photo memory quilt for a few weeks now, for a friend. She gave me an envelope of photos and told me to do whatever I wanted to with them. That is the hardest part of quilting. I know what I love, but I'm never really sure what the other person will. So after a few days of contemplating, I moved forward with it. I have had the embroidery program for the floral wreath forever, and always wanted to stitch it out. What better time than now. It was about 22 hours of stitching and 15 re-hoopings, but I was pleasantly surprised at how nicely it came out. Anita Goodesign has made the re-hoopings very easy with the templates you print out. I digitized the saying in the middle of the wreath. That was the only thing my friend was sure she wanted in the quilt.  The photos were printed out onto fabric, and it all started to come together.


The quilting was a little challenging, as I had to deal with some stretching from the embroidery, but I persevered, and am happy with the end results. The rays were a suggestion from my quilting buddy. It did help to take up some of the stretch. 

Brenda picked up the quilt last night and was thrilled with it. I got word this morning that her mom, who was the very surprised recipient, was equally happy with it. That is the best thanks you can get from a project now isn't it?  :-)

If you have never made a photo quilt, give it some consideration. It doesn't have to be this involved to make a statement. It truly is one of those special quilts that someone will cherish for many years to come, and long after we are gone is my guess!

Friday, March 4, 2011

Just one more St Patty's trivet cover

I love fusible applique, and this little guy was just about as fast as it can get.

One of the best places to find applique "treasures" is online. If you search for coloring book pages, you will be surprised what you find. You can click HERE for this one. I took it to a copy machine and reduced it to 78% the size of the original and it worked out nicely for our 6" tile.

If you have a few minutes this weekend, you might want to whip one up for yourselves!

Tuesday, March 1, 2011

Wearin-O-the Green - Trivet Tuxedo

Well, it's that time again. With St Patty's day right around the corner, our Trivet Tux is going to get us ready to celebrate the season.

For this one we are going to need only 2 fabrics. Your background (mine is black) and some green. This is truly one of those scrap box finds for the green. I had a piece that was only about 3" x 12" and I have leftovers!  :-)  That always makes me happy! This block is called the Rolling Stone.

 From your background you need to cut:

8 -  1 7/8" squares (cut these once on the diagonal)
4 -  1 1/2" x 2 1/2" squares
1 -  2 1/2" square

for your Green you need to cut:

4 -  2" squares
4 -  1 1/2" x 2 1/2" squares

You can see the layout for our sewing. The hardest part to piece is the corner triangles. If you take them step at a time, you will have no problems. I find it easier to line up my pieces so they are straight if I take the time to fold each piece in half and finger press them. That way everything goes where you need them to go.


Stitch 2 opposing sides first and press open before you sew the other 2.


Once you get them all stitched and pressed open trim to a 2 1/2" square. Notice on mine, that I have a directional print. Keep that in mind,if needed, as you sew your block together. I rotated my squares to face each other.
This block finished to 6 1/2" and if your using a 6" tile, your going to want to add a sashing around it to make it a 7" block. I cut 1" strips to bump mine out. It was easier to make it a little larger and trim it down than work with a strip that was any smaller.


So here you have it. A St Patty's day Tuxedo! Enjoy and keep that Green Beer consumption under control!
:-)  :-)