First off, I have not forgotten about my "Love Affair with Alexander Henry" post I promised. It's just getting a few finishing touched done on it! :-) It will be ready for reading by the end of the week..
But until then, I have to show you what I have been working on! :-)
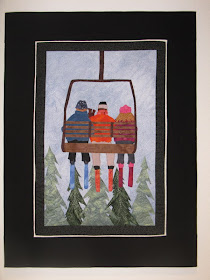
 I was asked to do some wall hangings to replace pictures at a rental condo on the ski slope at Keystone Colorado. What an honor for me! I started off with a pattern from Granola Girl that has been in my pattern stash for a very long time. We needed the quilt to actually cover the breaker box, so I lengthened it by adding the Colorado Rocky Mountain High. Just perfect for the location! In addition I used ultra suede for the foot prints and the soles and tops of the boots. It has a great dimension now!
Now on to our next project... Living room!
Since it's ski season, Debbie Neese over at Images in Fabric had the perfect patterns to use. I was able to jazz up the snow a bit with Angelina fibers, which was a fun thing to play with. That's been in my stash for years, and I had yet to play with it. Just why did I wait so long???? I really don't know!
In addition to the perfect patterns, Debbie gave an option of stretching it over an artist canvas or making a quilt. I choose the canvas, and let me tell you, I am delighted with the results. No more worrying about wavy wall hangings, sleeves and quilt hangers, binding! Whoo-hoo!
I thought I would share the process with you.
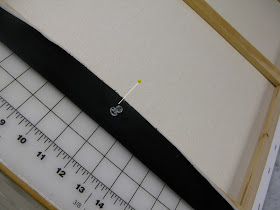
First you want to find the center on all 4 sides of your quilt and mark them with a pin.
 Once you have all 4 sides attached with the push pins, you can remove your straight pins from the quilt. At this point I added more pins to hold down my quilt, being careful to flip it back to the front to make sure that things were straight. It is very easy to make adjustments since we are only using push pins at this point.
  I do want to make sure things are lining up nicely with my ruler before I start the stapling process.
 Now the hardest thing about this entire process is the corners. If you flip your quilt top back a bit exposing the batting, like shown here
 You can easily cut off the excess batting, so the corners will lay nicely. I know it's a bit hard to see, but I hope this helps you get the idea. We just want to get rid of excess so it isn't bunching up on our ends. Try to cut it so the batting just butts up to each other, at the corners.
 Then we are going to start replacing those push pins with staples. I used a hand held Arrow Stapler. Not the kind you use for papers, but the heavy duty type they sell in the tool department. This is very easy to staple into so you don't need an electric one.
Staple up to your corners on both sides, then fold your fabric in, as smoothly as possible.
I like to use 2 staples in each corner just to make sure it holds nice and tight.
There you have it. All stretched and ready to hang like my 3 ski quilts are!
I do like the looks of these wall hanging's on the canvas. It gives it more of an art look, rather than just a quilt hanging on the wall. Besides the benefits I already told you about above, I didn't need backing, just the batting and I didn't have to worry about what my threads looked like on the back or take the time to pull the threads to the top, when I was free motion quilting this!! :-) It is all nicely hidden by the canvas.
Now speaking of that batting... Have you heard of Thermore?
A friend shared this find with me. It is a very thin poly batting from Hobbs. So thin in fact that this package at the widest is only about 3" thick and it's a queen size bat.
It has kind of a weird feel to the touch, but it has enough grip in it, that your piece stays put, while you are quilting. Best yet, it quilts perfectly flat. It is heaven for table runners and wall quilts. I haven't used it for a bed quilt yet, and am not really that enticed to do so, but WOW, is this the best I have ever used for art quilts and wall art!!
It runs about $20 a bag at JoAnn's fabrics. I got mine during a buy one get one free sale. And you can never run out of must haves, for those 40% off coupons they love to shower us with!!
Am I right??
:-)


I love what you are doing!!! Just awesome work!
ReplyDeleteLove your work...love your blog...wish we had a Joannes or a hobby lobby here...warm wishes from south africa
ReplyDeleteStunning work. I never thought about stretching a wall hanging over canvas. what a great idea!
ReplyDeleteYour art quilts are super. Thank you for the tips, too!
ReplyDeleteSo now you are taking art commissions! Wow! Very flash. I am impressed.
ReplyDeleteAll stirring aside - congratulations. I think it is a big vote of confidence when someone likes your work so much that they ask you to use is to decorate their house.
I love the choices you made. Sounds like they suit perfectly. And I can also see why you chose to use the canvas frames. They come up so well. Beautiful work!
Always something new going on at your place!
Very cool quilts! Definitely looks like art on the wall :) Thanks for sharing your tips!
ReplyDeleteYou have been very busy. Those are going to look great for a ski condo. Thanks for the tip on the batting too.
ReplyDeleteGreat tutorial, Joan! I agree that stretching our art quilts makes them look more like art, and you've done a great job here. Beautiful pieces!
ReplyDeleteDiane
What a great idea! I love your quilts... Will try this idea of using a canvas for wall hangings soon!
ReplyDeletehow cool! love it.
ReplyDelete