Recently I stumbled on a post for these adorable snowmen candy wrappers
over at "Be Different Act Normal".
Really now...
Who doesn't love a name like that.
She shows off her "Snowman"
And goes on to tell us that the tutorial page is no longer avail,
but she did share a link to the printable
Get your printable and I'll walk you thru the steps I took.
First I started out with King Size Hershey Candy bars.
It's easy to tell the nuts from w/o nuts when your snowmen are done.
You don't want any allergic reactions from anyone!
;-)
(I traced the heart only to make it easier for you to see in photos)
Lay your ruler about 1" right of the heart and fold the paper against the ruler,
to make a crease.
That's a good thing!
Now flip him over again and lay your candy bar on the widest side rolling the edge,
up to meet about where the seam of the candy wrapper is.
Run a line of glue along the fold on the right side, bring it over and on top sealing in the candy bar.
You can made adjustments by rolling the wrapper, so he is centered if needed.
Tack it with a little glue, as desired.

Add a scarf and decorate away.
I love the fun little seasonal buttons.
I've purchased a nifty little tool that clips the shanks off the back.
It's much nicer when your gluing them down on something.
That's it.
A big thanks to Laurie Furnell
who shared this adorable little printable with us.
Unfortunately it doesn't look like her blog is active anymore.
She had some adorable things!
:-(
Check them out for yourselves.
HERE
If your reading this Laurie, come back.
We want to see more!
Til next time...
Keep on Stitchin'
It's easy to tell the nuts from w/o nuts when your snowmen are done.
You don't want any allergic reactions from anyone!
;-)
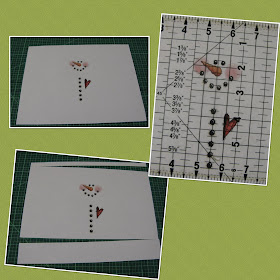
Start by printing your snowman on landscape mode. Full size.
You will get 1 per page.
I used my 6 1/2" ruler, setting it about 1/2" below the last button
and trimmed my page.
Flip the paper over. It's a little hard to see,(I traced the heart only to make it easier for you to see in photos)
Lay your ruler about 1" right of the heart and fold the paper against the ruler,
to make a crease.
Fold that piece down. It will be the widest piece and helps conceal
the writing on the wrapper.
(It's a must, you use regular printer paper as I did)
Now just above where that piece landed, run a line of glue with a glue stick
and fold the other side over to meet.
(the glue aids in the final folding process)
Flip him over and you can see there is considerably more paper on his left side.That's a good thing!
Now flip him over again and lay your candy bar on the widest side rolling the edge,
up to meet about where the seam of the candy wrapper is.
Run a line of glue along the fold on the right side, bring it over and on top sealing in the candy bar.
You can made adjustments by rolling the wrapper, so he is centered if needed.
Tack it with a little glue, as desired.
Let the decorating begin!
I used scraps of fleece cut 5" tall and 4 1/2" wide
(make sure the stretch is side to side, allowing it to slide over our snowman head)
Fold in half, stitch, and clip narrow strips on one end about 1 1/2" long,
to make the fringe. Turn right side out and slide onto snowman. Turning up to make a cuff.
Tie the fringe with a ribbon and tack down both front and back with a dot of glue.
(I used a low temperature mini hot glue gun)

Add a scarf and decorate away.
I love the fun little seasonal buttons.
I've purchased a nifty little tool that clips the shanks off the back.
It's much nicer when your gluing them down on something.
That's it.
A big thanks to Laurie Furnell
who shared this adorable little printable with us.
Unfortunately it doesn't look like her blog is active anymore.
She had some adorable things!
:-(
Check them out for yourselves.
HERE
If your reading this Laurie, come back.
We want to see more!
Til next time...
Keep on Stitchin'


I made those one year, but the hats were the cheap $1 gloves. Fold them together, put over the candy bar, tie the fingers together with some yarn to make it look like fringe.
ReplyDeleteThose are adorable.
ReplyDeleteAwww! These are so cute. I will have to see if we have and chocolate bars that would work for this.
ReplyDeleteThanks for all the info.