Sunday, June 30, 2019

A Time For All Seasons-July


This is the official half way point, of our BOM.
Whew...time flies!
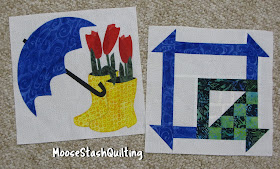
Ohhhh...Carla has treated us to some fun blocks for the month.
As we are a USA based group, we are waving our flag in celebration 
of our Independence Day, July 4th.

(If your not from the US, this fun block would look fabulous,
 in any of your favorite colors)

What's Americans favorite "4th of July" picnic food?
Carla, nailed it with this adorable block, don't you think?
I'm searching for that perfect watermelon for next week, myself!
LOL!!
You can download these blocks "Free" for the month of July, only
at "Creatin' in the Sticks"
After that, they will be available for a small fee.
This is how our BOM is shaping up...
I'm just loving it!
Don't forget to share your blocks on our Facebook page
We have sponsors who are providing fabulous monthly prizes.

Here is the schedule for this year...
February

March 
April
April Bonus
May
May Bonus 
June
July

September

October

November

December

January

til next time...
Keep on Stitchin'

Saturday, June 22, 2019

QAYG Made Modern

 "We’re shining a spotlight on some of our best sellers of all time,
 and this one made me think of you"
That was the happy mail I received from C&T Publishing, the other day.
They asked if I would review the book and do a project to share on my blog.
It just made my toes tingle and only took me 
all of 2 seconds to respond...yes, yes...of course I would!
I love QAYG projects. They are a great way to use up all those batting scraps,
 that tend to build up over time. 
Interestingly enough, this was another QAYG technique that I hadn't personally
tried out myself and I love learning new things.
I found this layer cake friendly project "Ballard Blocks", really spoke to me. 
I don't work with "Modern" fabrics much, but I've got some fun things in my stash, 
that I knew would work great.
The choices were tough...
There were all these fun food/snack fabrics...
 Or my treasured collection of what I like to call, the
"Naked Boys" from "Alexander Henry" fabrics.
LOL!!
Or this fun fat quarter stack of Parisian fabrics...
Decisions, decisions
????
Then, I stumbled on one of my all time favorites
Coffee!!!
Yep, that was it! It had to be a coffee quilt.
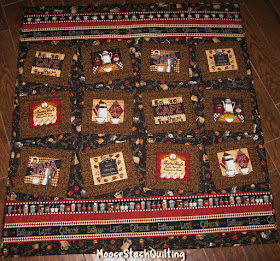
I had a panel print with 12 designs on it.
They were not 10" squares...
But, guess what...
This book teaches you how to build out your blocks right on your batting.
Heck ya, you can easily combine techniques from this book.
Adding a little sashing is easy, but they go into piecing 
different blocks, including a star block, too.

With the help of coordinating prints and a fun border...
This is my new crazy and highly caffeinated  QAYG quilt.
:-)
A perfect addition to my kitchen theme.
Sew... what do you think?
If you want to try some fun new QAYG techniques
you can find more on this book...
A big thanks to C&T Publishing for thinking of me.
This was a really fun, way to play!
til next time...
Keep on Stitchin'

Monday, June 3, 2019

Try It with "Island Batik"

This month the Island Batik Ambassadors trying something new, 
or showing you techniques, you may not have tried before.
This is always one of my favorite challenges.
I inspires me to get out of that "box" I put myself into
 and give something new, a whirl.
Well, not exactly like this though!
No, for this one I'm going to talk about binding irregular shaped quilts.
This is "Hen Party".
And these "Island Batik" fabrics make these "chicks" come to life, don't you think?
I was able to use part of a "stack" of "Paisley Dot" for the background.
This is one of my favorite fabric lines.
These are just a sampling of the beautiful fabrics in this "Stack".
I've used much of it, in other projects.

I've not personally ever added little wings to my quilts before, but
wow, does that give it some pizzazzzzzz!
It's really as easy as stitching your "wings", 
by matching the centers and pressing them out.
Where the trick comes in, is with binding it.
While I took this photo before it was quilted...
You will want to reinforce stitch the inner corner once that has been done. 
Stitch, just a few threads inside of the 1/4"seam allowance.
Then clip to your stitching line.
When attaching your binding, stitch to the center of the clip and stop.
Raise your feed dogs.
Give things a tug, until it's your piece is straight.
Lower your feed dogs and keep on stitching. 
You will want to check that corner once your past it to make sure
you kept that quarter in seam. It's easy to jump in a bit there. 
If so, just go over it again. The second time is usually the charm!
LOL!!
When pressing your binding out, 
press in a little pleat at each inner corner.
Before you start stitching down your binding,
 flip your project over and stitch a tuck
 about half way up from your stitching line
 at each inner corner, on just the underside layer of your binding.
As you can see, you will get beautiful results on both the top and bottom,
at those inner corners.
A big thanks it "Island Batik" for supplying these fabulous fabrics.
As well as to "Hobbs" for their batting. I am a huge fan of
"Thermore" batting. It's great for those project you want to lay perfectly flat.
Of course it goes without saying...
"Aurifil" thread is a must for stitching any project.
:-)
So you love those crazy hens as much as I do?
Well, you can find them and lots of other fun animal projects in this book
from Annie's Craft Store
Price: $7.99
Pattern in a downloadable format
  • Animal Attraction
  • Price: $14.99
  • Or in a book format.
  • *Please note these are affiliate links*
til next time...
Keep on Stitchin'